Introduction
In video games, repetitive sounds such as gunshots and footsteps need to be randomized to enhance realism. Unity introduced The Audio Random Container in version 2023.2 to handle randomization without the need for coding.
Although the Audio Random Container debuted in Unity version 2023.2, it received numerous bug fixes and improvements in version 2023.3. It is advisable to use this updated version for a more stable experience.
Creating An Audio Random Container
The Audio Random Container is an asset that can be created like any other asset in the editor. Simply right-click, select Audio → Audio Random Container in the project view, and drag it to an Audio Source component in the inspector. This is the same field where you can drag an audio clip:

Once added, you can play the Audio Random Container clips just like any other clip in the Audio Source component, by calling the play method of the Audio Source component, or ticking the Play on Awake box. For the Audio Source component the Audio Random Container is just another clip and everything that we could do to a clip we can do to the random container.
When you click on the Audio Random Container asset, you will see a button called “Edit Audio Random Container.” Clicking that button opens a new window containing all the Random Container settings.
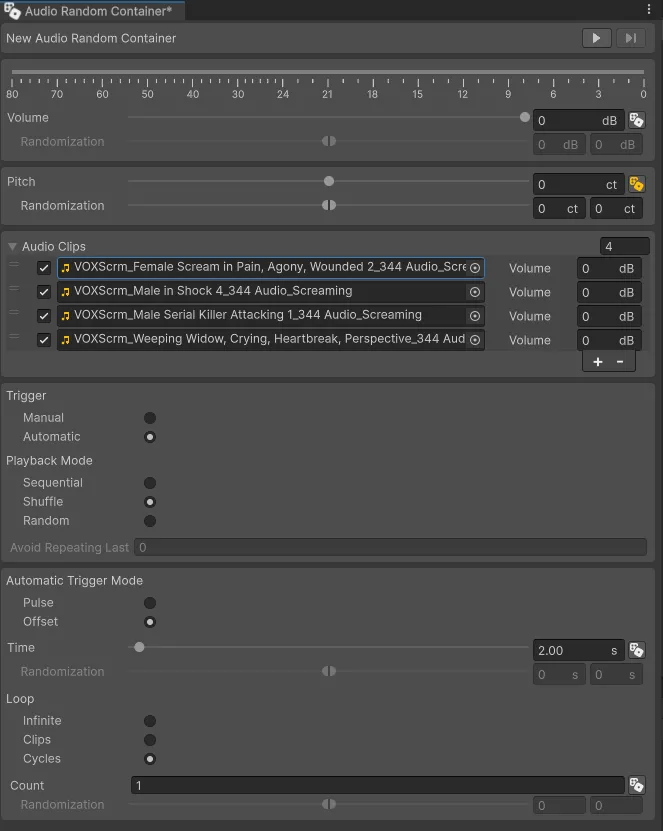
The Audio Random Container settings
The settings of the Audio Random Container can be seen after clicking the “Edit Audio Random Container” button:
The Play And Skip Buttons
At the top right, there are two buttons: play and skip. The play button starts and stops playing the list based on selected settings, while the skip button plays the next audio clip.
The skip button will start playing the next audio clip, (this may be the next in the sequence or the next random depending on our playback mode, more on that latter). The skip button at this moment won’t stop playing the previous clip. If we press the skip button, while a clip is playing, the next clip will start playing while the previous clip is still on.
The Volume segment
The first segment after the play and skip buttons, is the volume segment.
At the top we can see how loud a clip sounds when it is playing, with a green bar along the axis with the numbers:

Below that we can set the volume in dB and besides the volume bar, there is a randomization option, shown by a white icon resembling dice. If we press that icon it will turn yellow, to indicate that we can now randomize the volume.
The moment we press the randomization icon, the randomization bar becomes available for editing. Any randomization, defined as a range either with the help of the bar or by manually writing the numbers in the fields beside the bar, is calculated on top of the base volume value we have set:

This randomization, is shown with a yellow line, around the knob of the volume slider.
The volume is additive, based on the volume of the Audio Source we have placed our Audio Random Container in.
The Pitch Segment
The pitch segment is exactly like the volume segment, only it controls the value and the randomization of the pitch.
As with the volume, the pitch is combined with the value of the pitch in the Audio Source, but is logarithm defined in a cent scale.
Changes to both the volume and the pitch during play mode, persist when we exit play mode.
The Audio Clips Segment
The segment for audio clips is the area where we can incorporate our clips. It functions similarly to an array in the inspector. We can add or remove clips, enable or disable them using a checkbox beside each one, and adjust the volume for each individual clip in case some are louder than others:
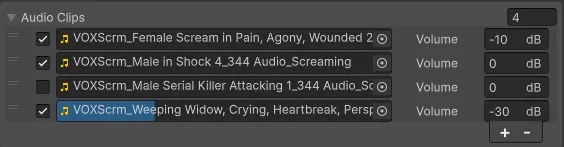
While a clip is playing, we can see its progress with a blue moving bar, as in the picture above.
The Trigger and Playback Mode Segment
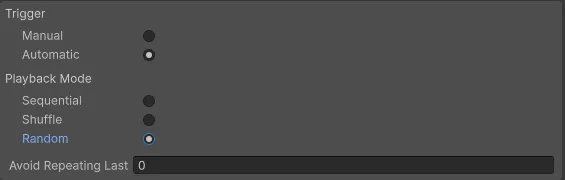
Here we can set the trigger and playback mode settings.
The trigger setting, when set to automatic, will play the clips based on the settings we have configured in the following segment. If set to manual, it will play the next clip whenever we invoke the play method in our audio source.
The playback mode determines the order of the next clip. When set to sequential, the audio clips will play in the order they appear within the Audio Clips segment.
If set to Shuffle, the clips will play randomly, with each clip playing only once until all the clips have been played. Depending on the settings in the subsequent segment, a new cycle may begin, playing all the clips again, each in a different random order this time.
When set to Random, the clips will play randomly, and each clip can repeat as many times as needed, as specified in the settings in the next segment. The “Avoid Repeating Last” field takes a number (x) that indicates the random selection occurs among all the clips, excluding the last (x) played clips.
The Automatic Trigger And Loop Segment
The last segment has two options:

The Automatic Trigger mode determines the time the next clip will start playing, offering two options: Pulse and Offset. The time bar allows us to set a number between automatic trigger activations, and, as before, there is an option for randomizing this time.
In Pulse mode, the time determines how many seconds after the start of an audio clip the next one will begin playing.
In Offset mode, the time determines how many seconds after the end of an audio clip the next one will start playing.
If a clip has a duration greater than the time set, and the trigger mode is in pulse, the next clip will start before the previous one has finished playing.
The Loop Segment defines the looping behavior among our clips.
With Infinite, the audio clips will keep looping indefinitely. For Clips and Cycles loop modes, we need to set a count that defines how many clips or cycles the audio random container will play.
As before, the count has a randomizing option.
Common use cases for the Audio Random Container
The Audio Random Container is more suitable for repeating sound effects or random sounds rather than music clips.
While we can create a list with music clips, the audio container lacks functionality for seamlessly blending those clips together. There is no way to gradually lower the volume of a music clip and mix it with the next one.
For repeating sound effects such as footsteps, gunshots, or leaves rustling, the audio container proves to be a time-saving solution, eliminating the need to create scripts for the same randomized functionality.
Sound effects that occur sporadically, like the sounds a unit makes when selected in a real-time strategy game or the occasional scream in a horror game, also find a suitable use case in the audio random container.
Conclusion
The Audio Random Container is a valuable addition to Unity’s audio tools, addressing a crucial functionality gap in most games that previously required manual coding by programmers.
When the automatic trigger mode is set to pulse, audio clips can overlap, offering significant utility. However, it’s important to note that each playing clip contributes to the maximum number of voices, even if only one audio source is utilized.
As mentioned earlier, I recommend utilizing the Audio Random Container from Unity 2023.3, as it incorporates numerous bug fixes. These fixes are unlikely to be backported to the 2023.2 version.
Thank you for reading, and as always, if you have any questions or comments you can use the comments section, or contact me directly via the contact form or by email. Also, if you don’t want to miss any of the new blog posts, you can subscribe to my newsletter or the RSS feed.