Introduction
About a month ago, Unity released a new package called Unity Behavior. As of this writing, it’s at version 1.0.3 and fills a significant gap in the Unity ecosystem. It’s a graph-based tool for implementing AI logic—something that was previously missing from Unity. Developers needing such a system either had to purchase one from the Asset Store or write their own.
Unity Behavior is still in its early stages. While testing it, I encountered a few minor bugs, but they were quickly patched by the very active development team. I believe now is the perfect time to start exploring its functionality, as this package is likely to become one of Unity’s most essential tools.

AI logic implementation is a core feature in game development, extending beyond AI for characters to influence many parts of a game. This could range from managing a menu’s state to graphical implementations of low-level collections like stacks. Those who have used other AI solutions, like ML Agents, may have realized that these solutions only address a narrow subset of AI problems. The Unity Behavior package aims to be a more flexible solution. At first glance, it might look like a graphical representation of behavior trees, but it offers much more.
In this post (and the next), I’ll introduce behavior trees, explain how to implement them using Unity Behavior, explore the various types of nodes, and highlight how Unity Behavior goes beyond traditional behavior trees. After covering the theory, I’ll provide examples of how to use the system, extend it by creating custom nodes, and clarify how it differs from visual scripting. I’ll also explain where and when to apply it and conclude with a small project example that demonstrates most of the concepts discussed, from visual node implementation to custom code logic.
What Is The Behavior Graph - Similarities And Differences With Behavior Trees
The Unity Behavior Graph, as the name suggests, is a tool that allows us to visually create graphs where nodes contain logic. These graphs can be attached to game objects in the scene, enabling them to change their behavior dynamically based on the game’s state. While the Behavior Graph can be used to implement logic that resembles behavior trees, it goes beyond that. It includes nodes that allow the graph to expand from a tree structure into a full hierarchical system, incorporating subgraphs with custom behaviors that, when combined, form complex AI systems.
Although the Behavior Graph can implement all the functions of a traditional behavior tree, it also offers additional features. These include nodes that allow logical comparisons and branching based on results, nodes that can merge different parts of the graph to continue along separate branches, and nodes that can repeat only certain parts of the graph under specific conditions. It also supports subgraphs that can be aborted, repeated, or even altered based on external events. The Behavior Graph includes event channels, enabling communication not only within the same graph but across different graphs throughout your game.
One of the Behavior Graph’s greatest strengths is its ability to operate in isolation while still interacting with other graphs and any data representing the game’s state—from simple primitive variables to events and even the outcomes of other graphs.
Before diving deeper into the usage of the Behavior Graph, it’s helpful to first introduce the basics of behavior trees, how they assist in implementing AI logic, and the essential nodes they utilize—many of which are part of the Behavior Graph’s broader functionality.
An Introduction To Behavior Trees For AI Logic
Since this post is about the Unity Behavior Graph, I won’t focus on the actual code implementation of behavior trees. Instead, I’ll describe their use with real-world examples, which we can later build on using the visual representation of nodes in the Behavior Graph.
Behavior trees, as the name suggests, are hierarchical trees of nodes that, when followed from top to bottom, create logic that defines the desired behavior of an agent or object we want to control in a game. Implementing AI logic with behavior trees is highly iterative. A simple node can later be expanded into its own subtree with more complex logic. Expanding the tree vertically adds detailed logic, while expanding it horizontally allows for alternative behaviors. This flexibility enables developers to add new logic without modifying existing parts of the tree.
It’s important to note that both Unity’s Behavior Graph and traditional behavior trees don’t traverse their nodes in a single game tick. Instead, they span multiple game loops, making behavior trees more efficient since their complexity doesn’t increase their performance cost. One key difference between traditional behavior trees and the Unity Behavior Graph is that behavior trees typically traverse from the root to the relevant node every game loop. In contrast, the Unity Behavior Graph offers nodes that limit traversal, such as nodes that repeat only specific parts of the graph until a condition is met.
A behavior tree can include various types of nodes, but all nodes must return one of three statuses: Success, Failure, or Running. In Unity Behavior, nodes can return one of five statuses: Success, Failure, Running, Waiting, or Initializing. The “Running” status is particularly significant as it signals that the node will continue executing on the next game loop. For example, a node responsible for patrolling will return “Running” while the agent is patrolling and will eventually return Success or Failure depending on whether the agent reaches its destination. These statuses are reported to each node’s parent, allowing the tree’s logic to expand both vertically and horizontally. The success or failure of one node affects the execution of its parent and sibling nodes.
Behavior trees have three main categories of nodes: Composites, Decorators, and Leaves. Only composite nodes can have more than one child, while decorators have exactly one child, and leaf nodes have none. Here’s a simple way to understand these nodes:
- Composite nodes manage the order of execution of their children and report a status based on the combined statuses of their children.
- Decorator nodes transform the result of their child node.
- Leaf nodes (the most important) contain the actions that make up the behavior logic.
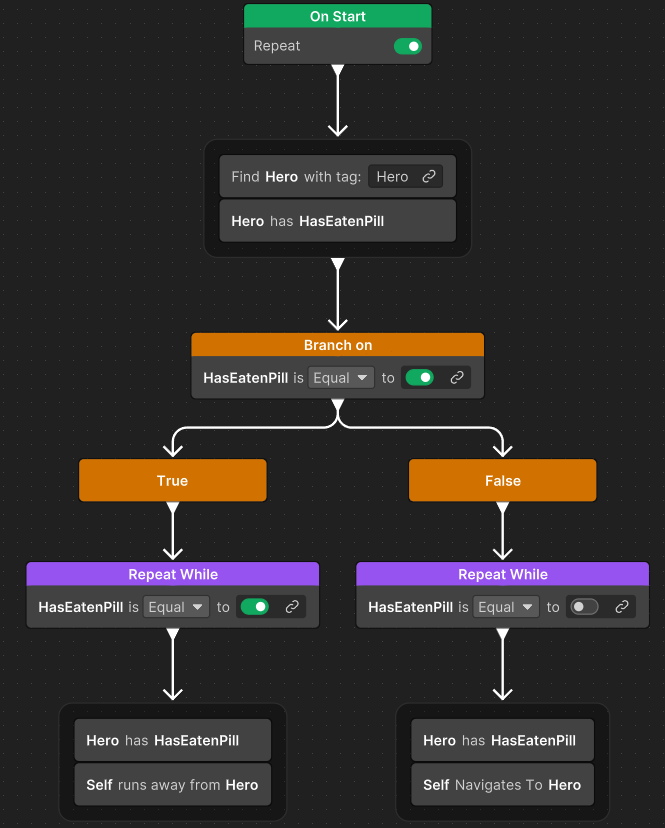
The Unity Behavior Graph differs slightly from traditional behavior trees by introducing additional node types. While it still has leaf nodes (called action nodes), decorators (called modifiers), and composites (called sequencing nodes), it also includes join nodes, which merge branches, turning the tree into a graph. Conditional nodes execute different branches based on conditions, like if/else or switch statements. Lastly, it has event nodes that dispatch and listen for events.
Here’s an example of what a simple behavior graph might look like:

The Different Kind Of Nodes In The Behavior Graph
Let’s take a closer look at the different types of nodes in the Behavior Graph.
Action nodes, as mentioned, form the core of our logic. However, in the Behavior Graph, they differ slightly from traditional behavior trees. In the Behavior Graph, Action nodes can have a child. In the diagram above, you can see that each of the two leaf nodes consists of two different action nodes, stacked vertically. This indicates that the actions are combined, though they remain independent in how they execute. Each action can return a status of “running,” meaning the action below won’t execute until the previous action’s status allows it. While these actions are displayed together visually, they are still treated as separate actions in the logic of the behavior.
There are various types of Action nodes. Some are designed to get or set variables, others handle specific agent logic like moving or turning, and some execute Unity-specific logic such as navigation, physics, MonoBehaviour interactions, or scene manipulation. Despite the range of built-in actions, there will likely be times when you need to create custom action nodes, which can easily be done programmatically in Unity. We’ll cover that in the next post.
In addition to Action nodes, there are Modifier nodes, which alter the result they receive. For instance, a modifier might reverse a success to a failure, or vice versa. You might wonder why this would be useful. It allows us to reuse nodes without duplicating code. For example, imagine a composite node that waits for all its children to finish executing and only returns success if all children succeed. This could be used in a situation where an agent checks if a building is safe, returning success if all doors and windows are closed. If an action node returns success when a door is open, instead of rewriting the logic to check if the door is closed, you can use an Inverter node to flip the result before sending it to the parent composite node.
Next, we have Composite nodes, which form the decision-making backbone of our graph. While Action nodes handle the “how,” Composite nodes decide “if” and “when” things happen. Composite nodes contain multiple children and return a result based on their children’s outcomes. Some composite nodes return success if only one child succeeds, others return success if all children succeed, some allow children to run in parallel, and others run children sequentially but only if the previous child succeeded.
The Behavior Graph also includes Conditional nodes, such as “if” nodes that execute different branches based on a boolean expression, and “switch” nodes that execute a different branch depending on an enumeration value. There are also repeat nodes, which repeatedly execute their child branch based on a condition (similar to a while loop in programming), cooldown nodes that delay execution, and more.
Finally, there are Event nodes. These are particularly useful for passing events not only between nodes within the same graph but also between different graphs. Events, variables, and conditions in the Behavior Graph can be managed in two places: the blackboard and the inspector.
The behavior Graph’s Blackboard And Inspector

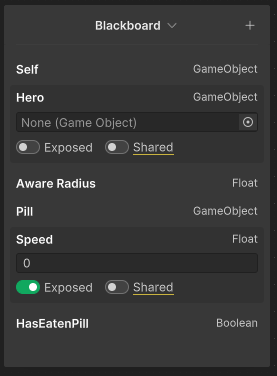
In the image above, you can see the Behavior Graph’s blackboard. The blackboard stores all the variables used throughout the graph. Those variables are being used in different places in our graph and are responsible for the logic and the flow of control of the graph. Each variable in the blackboard, aside from its type and value, has two additional boolean properties. The first is “Exposed,” which, when set to true, makes the variable visible in Unity’s Inspector for value assignment. You can think of this as similar to the “SerializeField” attribute in code. The second is the “Shared” property, which, when enabled, makes the variable available across all instances of that particular graph. These variables can be dragged and dropped onto nodes that require them.
Each graph can be used across multiple game objects in the scene. This is possible because the graph is assigned to a Behavior Agent component, which takes the graph as a parameter and exposes its “Exposed” variables in the Inspector:

Another key feature of the Behavior Graph is the Inspector window within the graph editor:

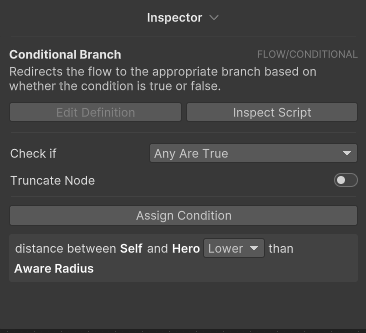
The Inspector displays details for each node, allowing us to modify its behavior. For instance, with an “If” node, the Inspector enables us to set conditions. This is highly useful because it eliminates the need to create different “If” nodes programmatically based on the number of conditions. Instead, the same node can be reused with various conditions defined directly in the Inspector.
In the image above, you can see that a conditional “If” node can have multiple conditions. The Inspector also lets us define how those conditions are evaluated—whether the branch executes if any condition is true (equivalent to “OR” in programming) or if all conditions must be true (equivalent to “AND”). At the top of the Inspector, you’ll notice two more buttons.
The greyed-out “Edit Definition” button is used for editing a custom node that was created programmatically. The “Inspect Script” button allows us to view the code for a node developed by the Unity team. If we’ve created our own nodes, this button changes to “Edit Script,” enabling us to edit the node’s implementation directly in our IDE.
Finally, the unity graph behavior window allow us to have sticky notes, that contain reminders and other useful information about our graph.
To Be Continued
This was an overview of Unity’s new Behavior Graph and its connection to behavior trees. While understanding the different node types, the theory behind the graph, and its UI is important, it’s not the most thrilling part. In the next post, I’ll dive into practical uses of the Behavior Graph, including how to create custom nodes, visually debug the graph at runtime, and finally, build a small game where the Behavior Graph controls the logic with minimal additional code.
This will emphasize the significance of the Behavior Graph and how it differs from visual scripting. Although both tools use a visual interface, visual scripting focuses on visually coding your game. In contrast, the Behavior Graph offers a visual representation of higher-level concepts, abstracting low-level implementations. Its nodes can be seen as state machines that connect to form logic, enabling decisions and actions.
You can read the second part here: How To Use Unity’s Behavior Graph Part 2 - Subgraphs, Events And Custom Nodes
Until part 2, thank you for reading, and as always, if you have any questions or comments you can use the comments section, or contact me directly via the contact form or by email. Also, if you don’t want to miss any of the new blog posts, you can subscribe to my newsletter or the RSS feed.