Introduction
This is part 2 of the introduction to Unity’s behavior graph. If you haven’t already, you can check out Part 1 here: How To Use Unity’s Behavior Graph For AI With Behavior Trees Part 1
In this part, we’ll dive into using subgraphs to avoid duplicating logic, implementing events to trigger specific logic when certain conditions occur, creating custom nodes with unique logic and behaviors, and visually debugging behavior graphs. Lastly, we’ll create a small game that relies on one Monobehaviour script, with all its logic implemented through premade and custom nodes in the Behavior Graph.
In this game, our “hero”, a blue ball, aims to eat as many enemies as possible. However, the enemies can catch and consume the hero unless he eats a black pill first. Once he consumes a black pill, he can hunt down and eat the enemies for a limited time. This setup mirrors the classic Pac-Man dynamic, where ghosts chase the player until a power-up turns the tables. For simplicity, the game will have no obstacles or levels; the focus is on adding different logic to each enemy, switching behaviors from evading to pursuing, and establishing priority in the AI’s decision-making.
Each node contains only a small amount of logic to showcase the Behavior Graph’s capabilities. Although some logic might be simpler to implement with traditional coding, the goal here is to demonstrate the range of features the Behavior Graph offers rather than best practices for AI design. The visuals use Unity primitives, as graphics aren’t crucial to illustrating a sample Behavior Graph-driven game:
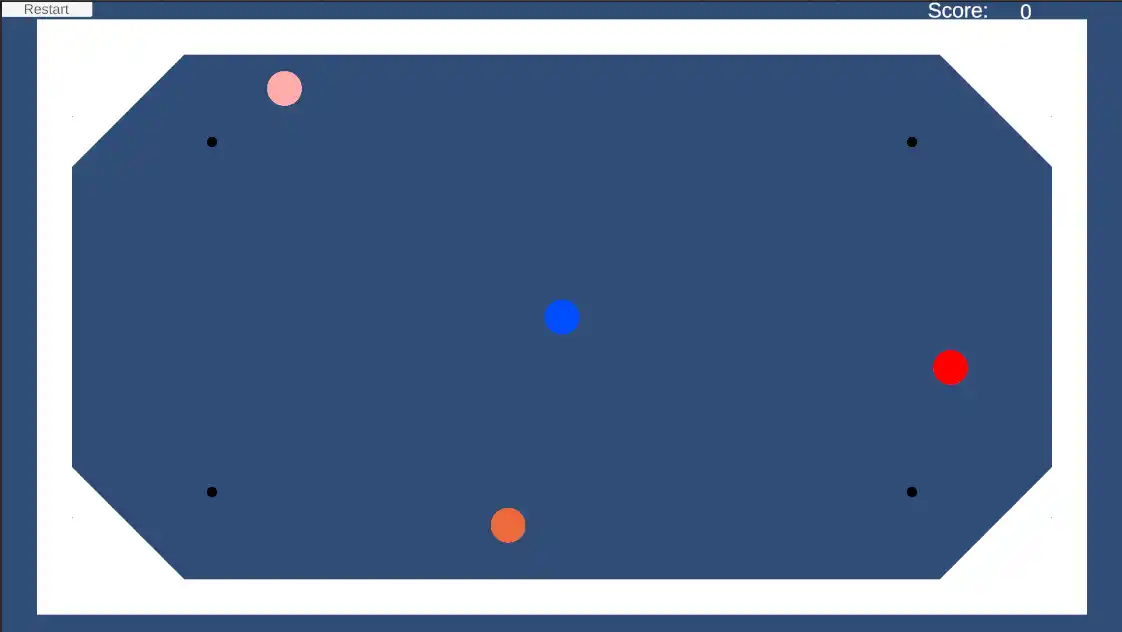
You can find the Unity project for this game in my github repo.
Subgraphs
As we build behavior trees with logical graphs, we’ll eventually notice sections of logic that repeat with slight variations in data, similar to repeated code in a program. Just as we create methods with parameters to eliminate redundant code, we can make graphs that aren’t directly for game agents but are designed to be incorporated into other graphs.
For instance, when our hero eats a pill, all enemies, regardless of their previous hunting logic, will now start to flee. Instead of duplicating this logic, we can create a subgraph:
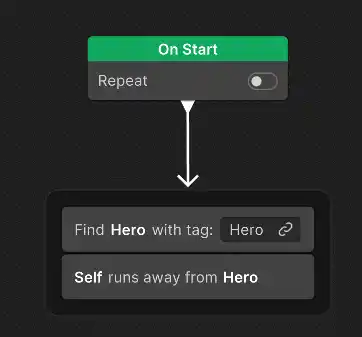
Here, the necessary variables are exposed in the blackboard:
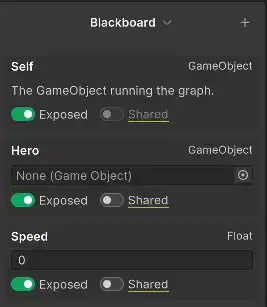
These variables can also be embedded in the subgraph representation itself without needing exposure, allowing them to be directly accessible within the subgraph setup instead of through the Inspector. However, I don’t recommend this, as this functionality appeared somewhat buggy in version 1.0.3, the current version as of this writing.
Once our graph is ready, we can add a Run Subgraph node to any of our other graphs and select it from the assets tab:
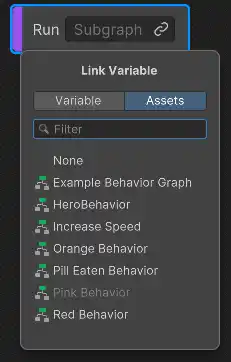
All exposed blackboard variables can then be assigned within the Inspector.
Sending And Consuming Events
Events play an essential role in programming by allowing us to trigger functionality when something specific occurs, instead of relying on polling. While event nodes aren’t part of traditional behavior trees, they enable branches of the behavior graph to execute in response to events.
Here, the term “branch” is used loosely since the behavior graph isn’t limited to a single tree structure. We can have multiple trees, each starting at its root event and running independently. For instance, the Start node is an event node itself, and multiple Start nodes can exist within one graph. In the following image, you’ll see the three main event nodes available: one that starts on an event, one that waits for an event, and one that sends an event:
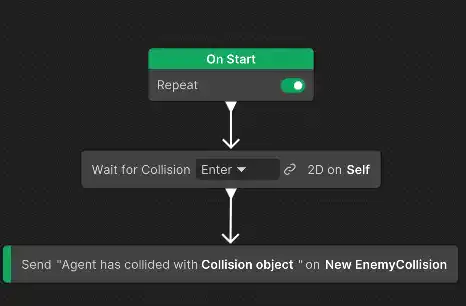
The second node waits for a collision to the self game object, defined in the inspector as a Collision object with the Enemy tag:
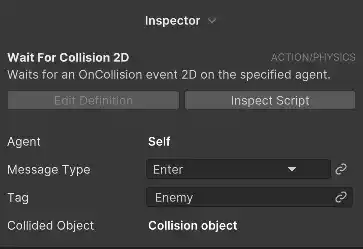
When this collision occurs, it sends an event through the New EnemyCollision ScriptableObject.
This ScriptableObject is created in the Project window under Create -> Behavior -> Event Channels. By assigning it to the blackboard variable (by exposing it in the Unity Behavior Agent component) in both graphs where we use a send event node and a start-on-event node:
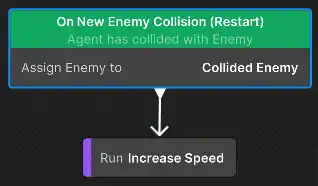
It acts as “glue” between graphs. This is similar to sharing data between graphs using common variables assigned in the Behavior Agent component.
In the inspector, event nodes offer options to execute normally, restart each time the event is received, or execute only the first time the event is triggered.
Custom Actions Nodes
The behavior graph, allows us to create our own action nodes, that execute their own logic. For example, in this game we want to have a node that moves a gameobject towards another gameobject.
While the behavior graph already has a Navigate to Target node, it doesn’t work in 2D since it relies on Transform.LookAt, which causes issues with the 2D coordinate system and makes our game object disappear. Fortunately, creating custom nodes is straightforward: we define our own action, specify a name and category:
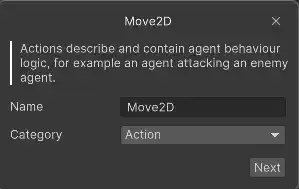
and a description:
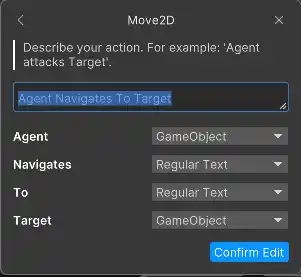
As you can see, in the description, we can choose the “type” every word can be. It can be a regular text, or a specific type. This allows us to drag and drop our blackboard variables in the nodes description in the graph:

Here we’ve assigned the self and Hero variables. Additional variables can also be assigned in the inspector:
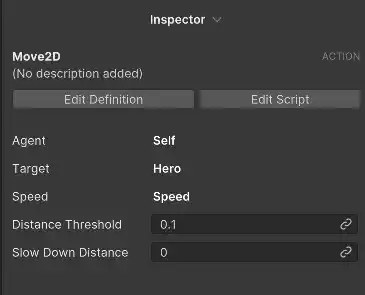
Once set up, a script is generated that we can edit in our IDE. This script is automatically populated with the NodeDescription attribute (containing our description), serializable references of the type BlackboardVariable<T> (where T is the type of each variable), and methods for implementing our custom logic.
Bellow is the Move2DAction class, with the OnStart and OnUpdate methods implemented for our custom Move2D node:
using System;
using Unity.Behavior;
using Unity.Properties;
using UnityEngine;
using Action = Unity.Behavior.Action;

[Serializable, GeneratePropertyBag]
[NodeDescription(name: "Move2D",
   story: "[Agent] Navigates To [Target]",
   category: "Action",
   id: "739a0711c5da6e4ca560ae951d045b61")]
public partial class Move2DAction : Action
{
   [SerializeReference] public BlackboardVariable<GameObject> Agent;
   [SerializeReference] public BlackboardVariable<GameObject> Target;
   [SerializeReference] public BlackboardVariable<float> Speed = new(1.0f);
   [SerializeReference] public BlackboardVariable<float> DistanceThreshold = new(0.2f);
   [SerializeReference] public BlackboardVariable<float> SlowDownDistance = new(1.0f);

   private float _previousStoppingDistance;
   private Vector2 _lastTargetPosition;
   private Vector2 _colliderAdjustedTargetPosition;
   private float _colliderOffset;
   private Rigidbody2D _agentRb;

   protected override Status OnStart()
   {
      if (ReferenceEquals(Agent?.Value, null) || ReferenceEquals(Target?.Value, null))
         return Status.Failure;

      return Initialize();
   }

   protected override Status OnUpdate()
   {
      if (ReferenceEquals(Agent?.Value, null) || ReferenceEquals(Target, null))
         return Status.Failure;

      // Check if the target position has changed.
      bool boolUpdateTargetPosition = !Mathf.Approximately(_lastTargetPosition.x, Target.Value.transform.position.x) || !Mathf.Approximately(_lastTargetPosition.y, Target.Value.transform.position.y);
      if (boolUpdateTargetPosition)
      {
         _lastTargetPosition = Target.Value.transform.position;
         _colliderAdjustedTargetPosition = GetPositionColliderAdjusted();
      }

      float distance = GetDistanceXY();

      if (distance <= DistanceThreshold + _colliderOffset)
         return Status.Success;

      float speed = Speed;

      if (SlowDownDistance > 0.0f && distance < SlowDownDistance)
      {
         float ratio = distance / SlowDownDistance;
         speed = Mathf.Max(0.1f, Speed * ratio);
      }

      Vector2 agentPosition = Agent.Value.transform.position;
      Vector2 toDestination = _colliderAdjustedTargetPosition - agentPosition;
      toDestination.Normalize();
      agentPosition = toDestination * speed;

      _agentRb.linearVelocity = agentPosition;

      return Status.Success;
   }

   protected override void OnDeserialize() => Initialize();

   private Status Initialize()
   {
      _lastTargetPosition = Target.Value.transform.position;
      _colliderAdjustedTargetPosition = GetPositionColliderAdjusted();

      if (!Agent.Value.TryGetComponent(out _agentRb))
      {
         Debug.LogError("Agent Doesn't have a RigidBody!");
         return Status.Failure;
      }

      // Add the extents of the colliders to the stopping distance.
      _colliderOffset = 0.0f;
      Collider2D agentCollider = Agent.Value.GetComponentInChildren<Collider2D>();
      if (agentCollider != null)
      {
         Vector2 colliderExtents = agentCollider.bounds.extents;
         _colliderOffset += Mathf.Max(colliderExtents.x, colliderExtents.y);
      }

      return GetDistanceXY() <= DistanceThreshold + _colliderOffset ? Status.Success : Status.Running;
   }

   private Vector2 GetPositionColliderAdjusted()
   {
      Collider2D targetCollider = Target.Value.GetComponentInChildren<Collider2D>();

      if (targetCollider != null)
         return targetCollider.ClosestPoint(Agent.Value.transform.position);

      return Target.Value.transform.position;
   }

   private float GetDistanceXY()=> Vector2.Distance(Agent.Value.transform.position, _colliderAdjustedTargetPosition);
}
You can check the github repository for the rest of the custom actions implementations.
Custom Flow Nodes
Just as we can create custom Action Nodes, we can also create custom Flow Nodes, including sequencing or modifier nodes. The process is similar, with the main difference being that our class inherits from a different type than Action and requires distinct overridden methods.
For an example of a custom condition, you can refer to the EnemyCloseCondition class in the project.
Debugging
The Behavior Graph offers two debugging methods. The first is by pressing the Debug button on the top left and enabling debugging. This will add icons beside each node during runtime, showing which nodes are being executed and which have successfully completed. This provides a quick overview of the logic’s correctness by indicating if and when each branch in the graph is activated.
The second method is by right-clicking on a node and selecting Toggle Breakpoint. This will add a breakpoint that works in debugging mode the same way we add breakpoints in our code for using the debugger. The moment the flow of control reaches that point, the associated code will open in our IDE, showing each variable’s values at that specific moment.
A Small Example
In the example game the blue circle tries to avoid the red, pink, and orange circles and then reach one of the four “pills” represented by small black circles. After eating the pill, it tries to hunt down and eat the other circles for a brief period. Each time it “eats” an enemy, the enemy respawns with its speed increased by 0.5. Each enemy normally hunts the blue circle but will avoid it for the pill’s duration once the blue circle consumes it.
Each enemy uses a unique hunting approach. The red circle moves directly toward the blue. The orange circle checks its surrounding area; if the blue circle isn’t nearby, it selects a pill at random and guards it until the blue circle enters its “awareness” range. Lastly, the pink circle captures the blue circle’s position and then rushes toward it.
All movement-related variables can be adjusted in the editor. The project includes six different behavior graphs: four for each circle’s behavior (blue “hero” and enemies) and two subgraphs. One subgraph manages the behavior of enemies when hunted, and the other increases each enemy’s speed after being “eaten.”
These behavior graphs utilize various behavior graph features. The speed-increase graph is an isolated subgraph that triggers via an event, while the pill-eaten graph showcases a shared enemy behavior and demonstrates how easily common behaviors can be modified across multiple agents.
The red behavior graph is a simple conditional branch demonstrating custom action nodes. The orange behavior graph showcases the repeat node, which repeats only a specific part of the branch under certain conditions and includes a custom condition to choose between guarding a pill or chasing the hero. The pink behavior graph uses the wait node to delay part of its branch and features a custom node for 2D movement to a target position instead of a target game object.
Finally the increase speed graph, shows how a branch node can be used, in case we are only interested for executing behavior if a condition is true.
A Word Of Caution
Some of the things that are being done in these graphs, should have be done in code in a Monobehaviour. Some of those would be simpler in a Monobehaviour and some would be better and easier to refactor if were done in code instead of a graph. The behavior graph is not about having nodes that execute a couple of statements. This is an example of its usage, but ideally, each graph node should contain abstracted, complex logic relevant to the Agent’s state, rather than executing a few lines of code.
Moreover, consider which actions should be handled within the behavior graph versus in code. Behavior graphs are best suited for implementing AI logic rather than serving as a visual scripting tool for non-AI behaviors. For example, the speed-increase subgraph might be more effectively implemented as a code-based solution.
Conclusion
As of this writing, the Behavior Graph is at version 1.0.3. While experimenting with it for these posts and the sample project, I encountered two main issues. First, the behavior graph still has a few bugs. Although the development team behind it is very active in both the forums and bug fixes, I would be cautious about using it in production environments just yet. It’s worth exploring for hobby projects and reporting any bugs you come across to help speed up its readiness for production. However, I recommend waiting a bit longer for it to mature before using it in a real-world application.
The second issue is one that depends on each developer’s approach: there’s a risk of using the Behavior Graph as a visual scripting tool. Because it’s more versatile than traditional behavior trees and works seamlessly with Unity’s API, it could easily become a tool for wrapping simple Unity methods in custom nodes or executing non-AI-related gameplay logic. Ideally, the graph should be used to represent complex agent behaviors rather than general gameplay code.
Despite these concerns, the Behavior Graph is a valuable addition to Unity, addressing a gap in AI logic creation that previously relied on custom solutions or third-party assets. It’s a welcome and somewhat unexpected feature in the Unity ecosystem, released without prior announcements or anticipation, and provides developers with new, native tools for AI.
You can get the project from my github repo.
As always, thank you for reading, and if you have any questions or comments you can use the comments section, or contact me directly via the contact form or by email. Also, if you don’t want to miss any of the new blog posts, you can subscribe to my newsletter or the RSS feed.